Showing posts with label Kitchen. Show all posts
Showing posts with label Kitchen. Show all posts
Monday, 22 December 2014
More floors and more tiles
We're so focused on getting stuff done, not to mention my wife is also working a lot over the holidays, that we've missed the window for sending Christmas cards! So with that in mind, less text, and more video. Click here for the big version, and not that little postage stamp below.
Thursday, 20 November 2014
The kitchen has landed
It seems I've been a bit remiss with the updates, but I have a good excuse: burning the candle at both ends. Starting the day job shortly before 8am, popping over to the building site at around 4:30pm and, the last few nights, staying there till midnight with an hour break for supper with the family. But energy levels are high, and I'm getting a lot done up on the neglected second floor. But I'll come back to that in another post. This post is all about the kitchen. Major milestone alert!
On Monday last week, the people from wohnfitz came with the kitchen. They spent two days in the house, putting it together, and I have to say, I'm really pleased with both the kitchen, and the care they took fitting it. We made our initial order about two years ago! So this was a long time coming, and when I look back at two or three years with of photos from the same room, it's been an amazing transformation, if I do say so myself. Of course, all the stuff I did is now hidden!
And now, the gallery.
And the kitchen is in...


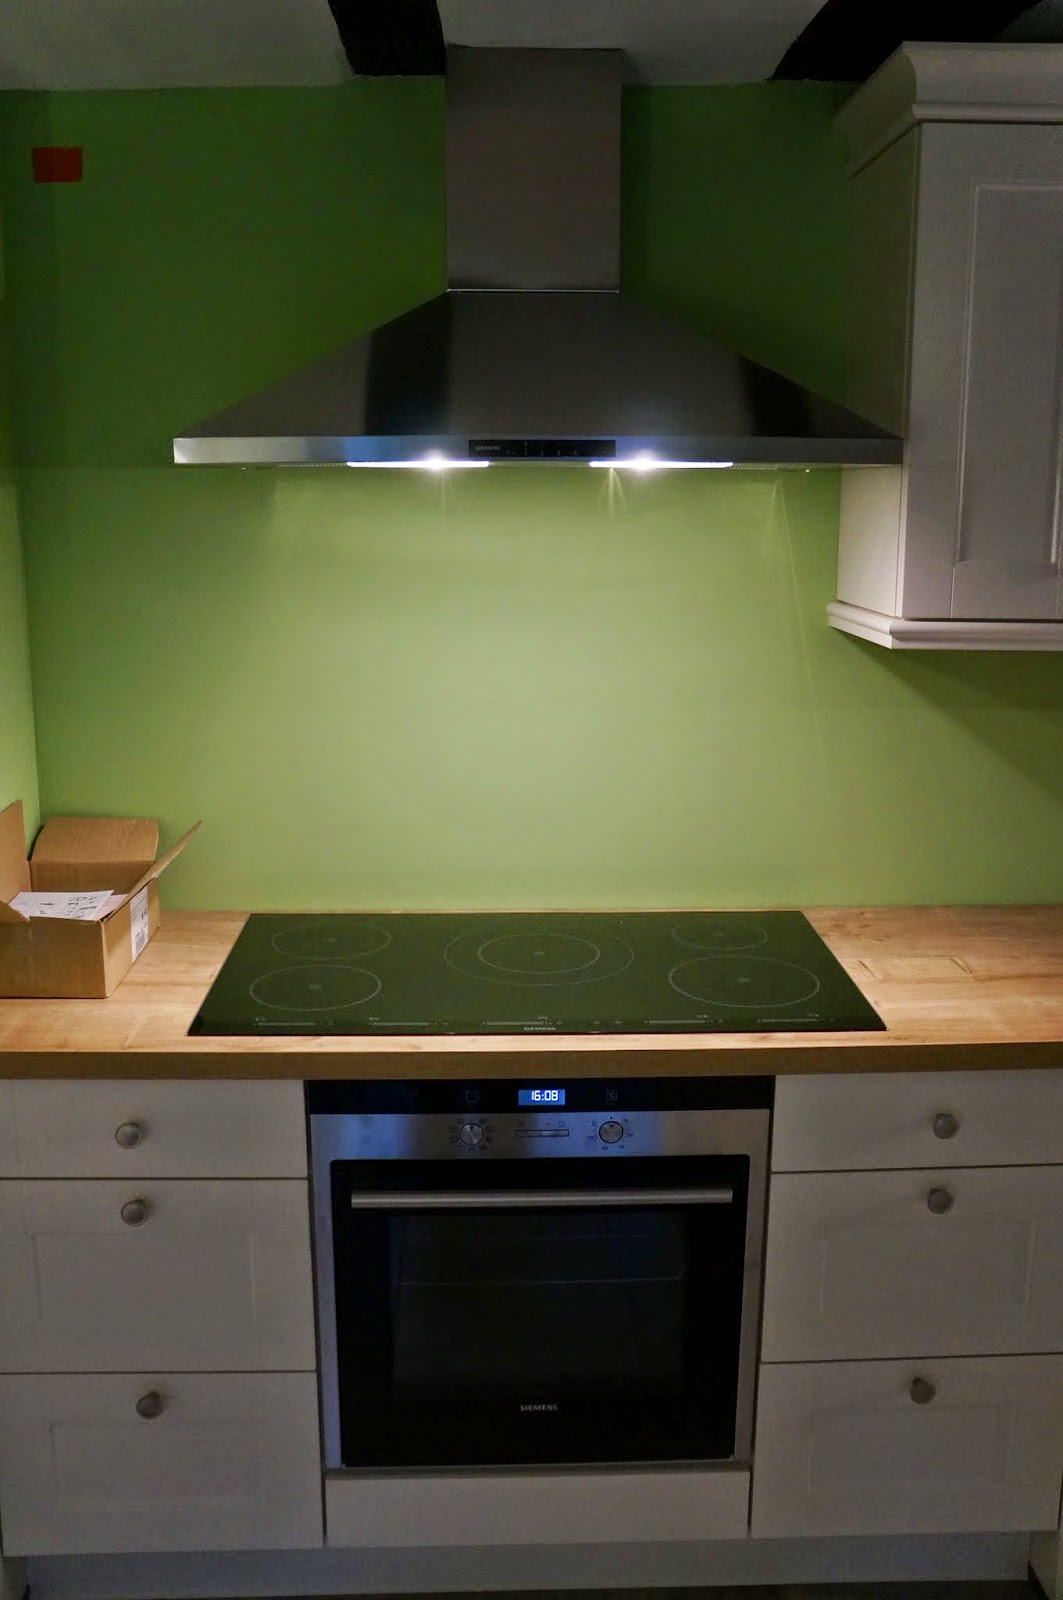

There's still some detail work to do. We have to pick tiles for a splash back (we'll probably use the same model as the floor tiles, but smaller) and fit the lighting, but once we move in, we'll make it truly our own with other touches.
For a live view, you can also have a look at a bit of a walkthrough here from last weekend (including a quick look upstairs where it really is still a building site).
On Monday last week, the people from wohnfitz came with the kitchen. They spent two days in the house, putting it together, and I have to say, I'm really pleased with both the kitchen, and the care they took fitting it. We made our initial order about two years ago! So this was a long time coming, and when I look back at two or three years with of photos from the same room, it's been an amazing transformation, if I do say so myself. Of course, all the stuff I did is now hidden!
And now, the gallery.
 |
| Painting done after the synthetic resin screed was laid. |
 |
| Tiled floor done! |
There's still some detail work to do. We have to pick tiles for a splash back (we'll probably use the same model as the floor tiles, but smaller) and fit the lighting, but once we move in, we'll make it truly our own with other touches.
For a live view, you can also have a look at a bit of a walkthrough here from last weekend (including a quick look upstairs where it really is still a building site).
Friday, 12 September 2014
Kitchen is Coming
A phrase that strikes more fear into my heart than a winter in Westeros. Kitchen is coming. Week 46. Second week of November. This means a lot of things have to fall into place, at least in the kitchen, before then.
But let's take a look back. We actually got our original kitchen design done about two years ago. We naively thought we'd have it installed within six months, but that's pretty much a recurring theme with our renovation. SInce the plastering, plasterboards and underfloor were all done a few weeks ago, it was time to get WohnFitz (renamed from Schäfer & Fitz) back again to remeasure, and a few days later to revise the plans and make sure the equipment we ordered was still available.
As it turns out, the only thing that was no longer available was the double sink in farmhouse style, so we opted for a single basin, but with a draining board. We slightly shifted the island so there was more space between it ans the other kitchen units, and swapped around some presses with drawers.
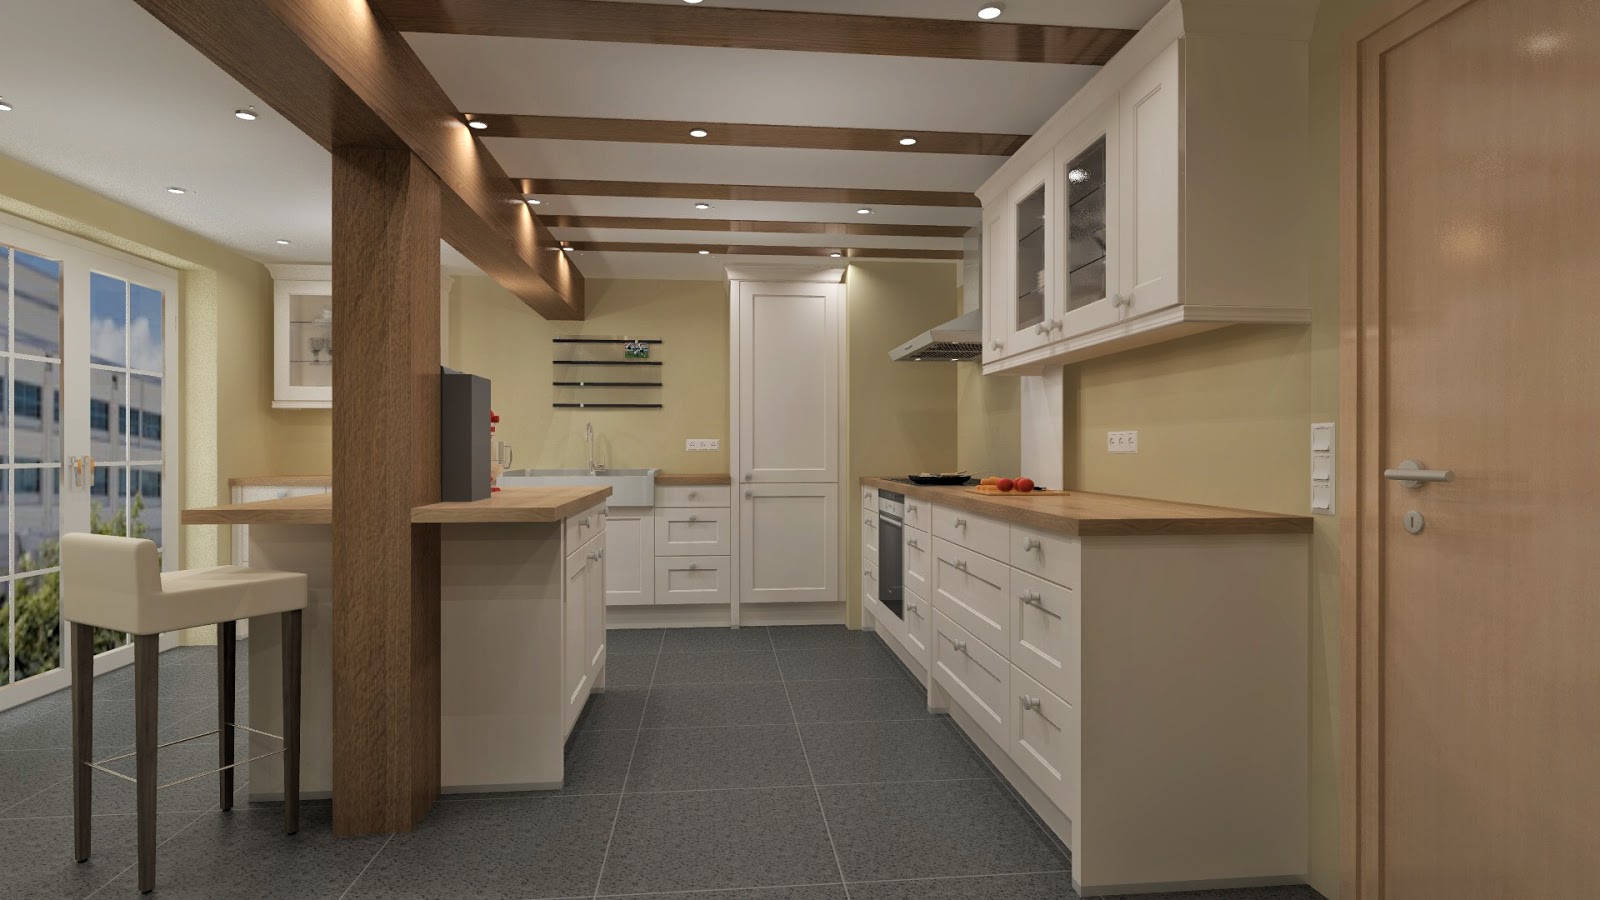
I still regret not having an oven at chest level, but I'm happy with the overall layout. And given the wonderful 3D renderings from Frau Krieger, we can imagine how it might look quite well.


So what has to be done? We ordered the floor tiles last weekend, so they should arrive from Italy in about a week. This is them.


Although there were paler versions of the same range available, we chose these to give a contrast with the vanilla tone of the kitchen units, so they work quite nicely together. We plan on laying them in about four weeks, so we've got that much time to sand down the filler/skim coats on the walls, paint the ceiling, connect the wiring and get the sockets running, apply whatever finish we decide on to the walls, and paint, if required. Not too much, actually, in the scheme of things.
My biggest issue is deciding on the wall finish. Either a roll-on plaster to give a slight structure to the finish (fine sandy grain), or just paint onto the skimmed walls. Then there's colours to choose. I could really do with tips from an interior designer to give some options, as my head is too full of construction details that need to be finished elsewhere.
Anyway. We're getting there, and the plan to move in before Christmas is still possible.
But let's take a look back. We actually got our original kitchen design done about two years ago. We naively thought we'd have it installed within six months, but that's pretty much a recurring theme with our renovation. SInce the plastering, plasterboards and underfloor were all done a few weeks ago, it was time to get WohnFitz (renamed from Schäfer & Fitz) back again to remeasure, and a few days later to revise the plans and make sure the equipment we ordered was still available.
As it turns out, the only thing that was no longer available was the double sink in farmhouse style, so we opted for a single basin, but with a draining board. We slightly shifted the island so there was more space between it ans the other kitchen units, and swapped around some presses with drawers.
I still regret not having an oven at chest level, but I'm happy with the overall layout. And given the wonderful 3D renderings from Frau Krieger, we can imagine how it might look quite well.
 |
| Yes, it could look like this! |
So what has to be done? We ordered the floor tiles last weekend, so they should arrive from Italy in about a week. This is them.
Although there were paler versions of the same range available, we chose these to give a contrast with the vanilla tone of the kitchen units, so they work quite nicely together. We plan on laying them in about four weeks, so we've got that much time to sand down the filler/skim coats on the walls, paint the ceiling, connect the wiring and get the sockets running, apply whatever finish we decide on to the walls, and paint, if required. Not too much, actually, in the scheme of things.
My biggest issue is deciding on the wall finish. Either a roll-on plaster to give a slight structure to the finish (fine sandy grain), or just paint onto the skimmed walls. Then there's colours to choose. I could really do with tips from an interior designer to give some options, as my head is too full of construction details that need to be finished elsewhere.
Anyway. We're getting there, and the plan to move in before Christmas is still possible.
Friday, 29 August 2014
Big leaps!
It's been a full-on couple of weeks since the last update. I had been continuing to install the plasterboard walls on the second floor, but when our friend Sace turned up with the panels for the kitchen floor heating, the focus switched completely to that.
Over most of a day, we put down a thin layer of expanded clay aggregate to level out the hollows left by my poor attempt at a liquid screed, followed by the panels you see below. Once these were down, five heating loops were laid.

We had intended to pour a liquid screed (pumped this time, not mixed by hand), but when we checked the levels, we has less than the 40-45mm clearance recommended by the manufacturer. I have to admit, the liquid screed was more or less a plan B, as we thought it'd be cheaper and we'd have enough height, but originally, we'd discussed a synthetic resin screed, which is what we fell back to. Sace made a few calls, and the next day someone came over to have a look and give us a quote. Three days later, they came a did it. The results were... spectacular.

The beauty of this system is that it needs no drying out time. So the next day, it was ready to be tiled. Also, you can go fairly thin, down to 1cm or so (we had 3 to 4cm).
If feels so weird having a perfectly level surface to walk on in the kitchen, after about three years of something resembling the surface of the moon.
This of course took away the last large barrier to our kitchen plans. Long-term-readers may recall we ordered our kitchen over 2 years ago, so it was time to revisit that, check the equipment still existed, and make some minor changes. I'll come to that in another post (it's worth it).
But of course, everything else needs to be done before the kitchen install, not least the floor tiles. But before that, the walls and ceilings need to be complete. Right now, the beams are all oiled, and the clay plater has been treated with a silicate-based "primer". The plasterboard walls and ceilings have been jointed and filled, and I've tried my hand at skim-coating the rest of the walls, with fairly decent results.
The skim-coating and filling has also continued into the living room, and once all of this gets some slight sanding and some corners cleaned up, we're actually ready to start decorating!Well, that and the window sills need to go in first.

So, quite a lot of progress in the last three weeks, but the next couple of weeks will be mostly filling, skimming and sanding, I fear.
And for those who like a proper commentary, here's a short walk-through of the first floor as of today. Click here for a large version.
Over most of a day, we put down a thin layer of expanded clay aggregate to level out the hollows left by my poor attempt at a liquid screed, followed by the panels you see below. Once these were down, five heating loops were laid.
We had intended to pour a liquid screed (pumped this time, not mixed by hand), but when we checked the levels, we has less than the 40-45mm clearance recommended by the manufacturer. I have to admit, the liquid screed was more or less a plan B, as we thought it'd be cheaper and we'd have enough height, but originally, we'd discussed a synthetic resin screed, which is what we fell back to. Sace made a few calls, and the next day someone came over to have a look and give us a quote. Three days later, they came a did it. The results were... spectacular.
The beauty of this system is that it needs no drying out time. So the next day, it was ready to be tiled. Also, you can go fairly thin, down to 1cm or so (we had 3 to 4cm).
If feels so weird having a perfectly level surface to walk on in the kitchen, after about three years of something resembling the surface of the moon.
This of course took away the last large barrier to our kitchen plans. Long-term-readers may recall we ordered our kitchen over 2 years ago, so it was time to revisit that, check the equipment still existed, and make some minor changes. I'll come to that in another post (it's worth it).
But of course, everything else needs to be done before the kitchen install, not least the floor tiles. But before that, the walls and ceilings need to be complete. Right now, the beams are all oiled, and the clay plater has been treated with a silicate-based "primer". The plasterboard walls and ceilings have been jointed and filled, and I've tried my hand at skim-coating the rest of the walls, with fairly decent results.
The skim-coating and filling has also continued into the living room, and once all of this gets some slight sanding and some corners cleaned up, we're actually ready to start decorating!Well, that and the window sills need to go in first.
So, quite a lot of progress in the last three weeks, but the next couple of weeks will be mostly filling, skimming and sanding, I fear.
And for those who like a proper commentary, here's a short walk-through of the first floor as of today. Click here for a large version.
Sunday, 8 June 2014
The heat is on.
We've been keeping the pace up the past couple of weeks, trying to keep to our goal of getting the wall plastering started as soon as possible. This of course means any remaining wall heating has to be installed which in turn means all the underconstruction has to be completed before the heating panels can be stuck on. This is now complete in my favourite room on the second floor, as well as starting to close the hole in he ceiling up to the next level.

It actually makes the room feel larger and a little brighter, as the old plaster and wood behind these panels wasn't the most reflective.

Having said that, I thought I'd include myself in a photo for a change, to give some sort of scale. And I'm not a tall man! Nevertheless, despite the low ceiling, it's roomy enough, and definitely cosy.


The gaping hole where the old chimney went has a new beam bolted to the others and laths installed ready to receive plasterboard.

Best of all, we finally closed off the wall behind which the spaghetti of cables and timber frames is hidden. Suddenly the kitchen feels cleaner and bigger.


And staying in the kitchen, the west wall was being prepped for fresh plaster by chopping off any loose stuff and keying the surface. While doing this, the big lumps were coming easily off the remaining chimney, revealing red brick. I hasn't thought his might be red brick, but it makes sense for a chimney.

Thinking this would make a nice feature, i removed all the plaster and then cleaned each brick with a nylon brush attachment on a drill, with quite nice results. All that's left to do is to scratch out some of the old mortar and repoint. I've plenty of experience of that!


Meanwhile, down in the cellar, Sace popped by yesterday and hooked up the wall heating in the bedroom and office (these designations are subject to change!), so now three rooms are running on the heating system Not that we need heating right now!

We've now a list of tasks that we need to complete in two weeks, if we want to stay on target and start plastering. Apparently our kitchen is coming in August! I doubt it...
It actually makes the room feel larger and a little brighter, as the old plaster and wood behind these panels wasn't the most reflective.
Having said that, I thought I'd include myself in a photo for a change, to give some sort of scale. And I'm not a tall man! Nevertheless, despite the low ceiling, it's roomy enough, and definitely cosy.
The past few days have been spent sorting the kitchen out, as it has been neglected for quite a while. The mesh has been nailed to the ceiling to carry new clay plaster.
The gaping hole where the old chimney went has a new beam bolted to the others and laths installed ready to receive plasterboard.
Best of all, we finally closed off the wall behind which the spaghetti of cables and timber frames is hidden. Suddenly the kitchen feels cleaner and bigger.
And staying in the kitchen, the west wall was being prepped for fresh plaster by chopping off any loose stuff and keying the surface. While doing this, the big lumps were coming easily off the remaining chimney, revealing red brick. I hasn't thought his might be red brick, but it makes sense for a chimney.
Thinking this would make a nice feature, i removed all the plaster and then cleaned each brick with a nylon brush attachment on a drill, with quite nice results. All that's left to do is to scratch out some of the old mortar and repoint. I've plenty of experience of that!
Meanwhile, down in the cellar, Sace popped by yesterday and hooked up the wall heating in the bedroom and office (these designations are subject to change!), so now three rooms are running on the heating system Not that we need heating right now!
We've now a list of tasks that we need to complete in two weeks, if we want to stay on target and start plastering. Apparently our kitchen is coming in August! I doubt it...
Sunday, 25 November 2012
Forgotten rooms
For the past while, between plastering, insulating and messing about, a couple of rooms have been more or less forgotten. Or perhaps avoided.In particular, the kitchen ceiling was a task I was not looking forward to, and the small room, which used to adjoin it. While my frind Siggi and I had done a good two days work on cleaning the beams in this small room and the bedroom, they still weren't quite in a state I wanted, so last week, I set myself a challenge to prep all ceiling beams on the first floor in three days, taking the Thursday and Friday off to do it. Needless to say, I didn't quite make it, as the big beams in the livingroom need another going over, but I'm pleased with the results. In particular, the kitchen, which alone too one-and-a-half days.

Oak dust is particularly bad for the lungs. Till now, I'd usually been using a FPP2 filter mask with a vent and protection glasses, but the recommendation is FPP3, which it what I eventually used with the full face mask. Felt a lot better breathing, and no more bits of clay and oak in my eyes, which is common when working on the ceiling!
 The bedroom got one more going over, although I did go deep cleaning the main cross-beam. As it had been painted, it really needed it to get as much of the point out of the cracks as possible. Here's a nice sequence for an update, having stitched photos together using the free Hugin panorama software (because I don't have a fancy camera). Click on the images below for embignation!
 And to the kitchen. Having started life as two rooms that we mashed together, and then gutted, removing all the cladding, dry lining and false ceiling, we were left with a decent sized room with soot-blackened beams. Looking back over old photos, it's just as well I forgot how much work we did just in ripping stuff out. The kitchen in particular was a filthy job.
The main beam got a deep clean last week, as it was quite pitted from the nut-shell blasting, which did not quite remove the carbonised-looking sooty layer. The result, was a lighter-coloured bean, which I like, as the ceiling here is low, and a dark beam would have made it oppressively so. The cross-beams just got a clean with nylon brushes, and they came out pretty well, although still quite rough, which I can live with.
The hall also got done before I could take no more, laving the two main beams in the living room, but I'll tackle them later.

In the small, northeast room, the beams were clean enough, but I wanted to see what happened if I took an angle grinder with a sanding disc to one, to remove the bleached-looking, splintery layer. Quite well, I thought (see photo below), but it was such an effort, extremely dirty, and did take away some of the rustic "charm" of the uneven beams, so in the end, I decided it wasn't worth it. Instead, the beams got a couple of cleans varying between a 40-grit sanding wheel for getting rid of the splinters, and an 80 and 320-grit nylon brush, to polish them up a little, and get the remaining plaster out of the grooves. Here's an update in photos.
 |
| Back in January 2011 |
 |
| The ceiling now. |
 |
| One of the beams (right in photo above) after deep cleaning. |
 |
| What I look like after deep cleaning with an angle grinder. |
 The bedroom got one more going over, although I did go deep cleaning the main cross-beam. As it had been painted, it really needed it to get as much of the point out of the cracks as possible. Here's a nice sequence for an update, having stitched photos together using the free Hugin panorama software (because I don't have a fancy camera). Click on the images below for embignation!
 |
| January 2011 |
 |
| Around September 2011. |
 |
| November 2012 |
Some plastering, and it's almost ready to use. Well, almost...
 And to the kitchen. Having started life as two rooms that we mashed together, and then gutted, removing all the cladding, dry lining and false ceiling, we were left with a decent sized room with soot-blackened beams. Looking back over old photos, it's just as well I forgot how much work we did just in ripping stuff out. The kitchen in particular was a filthy job.
 |
| January 2011. Still two rooms |
 |
| Around September, 2011. Everything ripped out. |
We'd also had to get in a new post to hold up the middle of the beam. This we got from a neighbour's wood pile, where it had clearly sat for a while, but was in great condition, other than being a bit geen, and soft at the corners. That got the treatment last week too.
 |
| January 2012, new post after initial sand-blasting of the ceiling |
 |
| The post today, almost gleaming. |
 |
| All cleaned up, November 2012. |
 |
| Still a lot to do here... |
For the next week, I'm setting myself a new challenge: get the undercoat skim plaster onto the bedroom and back room walls done by next weekend, so they are ready to receive the wall heating system (once I finish insulating the south side of the house, but more of that anon).
Tuesday, 31 July 2012
Kitchens
Some things need a lot of planning in advance, and the kitchen is certainly one of them. We need to know where things will go to plan the electrical and water/waste installations. Having spent considerable time browsing brochures and kitchen websites, we generally leaned in a "landhaus" or country style, but knew we'd never end up with something as good as the glossy photos, or the various showrooms we'd visited.
Enter Schäfer + Fitz, a fairly local company recommended by a friend.
After an initial meeting with Herr Weber, one of their salesmen who handily lives in our village, we discussed a couple of options for layouts, which I threw myself into using an online planner. On the floor plans, the kitchen looks large, but with low ceilings, one wall full of doors and a window, a great big post in the middle of the room and the early decision to put the dining room table in one half of it, space becomes a bit of a premium.
Early ideas were a U shape, which made great use of the working area, but threw a barrier across the middle of the room.

An L shape, with an island, and a couple of tall cabinets to house the fridge, a larder and an oven at a height (I really liked the idea of having the latter two items).
 The thing is, on these online planners, everything looks far more spacious than in reality. After marking out the floor plan with spray-paint in the actual kitchen, it became apparent that too many high cabinets could feel oppressive, and the layout of the worktops didn't make for practical workspaces, apart from the island.
And so, after much deliberation, and many late evenings playing with combinations of all of the above, we decided on as simple and as open as possible, with loads of workspace. This meant sacrificing some of the things I really wanted, but I think it's more practical.

Our final meeting with Herr Weber was this afternoon, picking out individual pieces of equipment (I had to scale back on my oven and dishwasher choices, which were way over our budget, but we've chosen an excellent fridge and hob), and we've basically ordered this to be installed in Spring next year, getting a good deal just about within our budget, but with, we think, great quality stuff.
Of course, what is not modelled above are things like the posts and beams, not to mention the extractor hood, so here's an early preview from Schäfer + Fitz.
 Of course, now I look back at our early ideas, I'd again love a higher level oven, but I know, when I go over and look at the reality, the cleaner lines of what we've signed up for make sense. The choice of colours, tiles, perhaps additional open shelving etc will, we hope, give it even more character. We have some time to go yet!
Enter Schäfer + Fitz, a fairly local company recommended by a friend.
After an initial meeting with Herr Weber, one of their salesmen who handily lives in our village, we discussed a couple of options for layouts, which I threw myself into using an online planner. On the floor plans, the kitchen looks large, but with low ceilings, one wall full of doors and a window, a great big post in the middle of the room and the early decision to put the dining room table in one half of it, space becomes a bit of a premium.
Early ideas were a U shape, which made great use of the working area, but threw a barrier across the middle of the room.

An L shape, with an island, and a couple of tall cabinets to house the fridge, a larder and an oven at a height (I really liked the idea of having the latter two items).

And so, after much deliberation, and many late evenings playing with combinations of all of the above, we decided on as simple and as open as possible, with loads of workspace. This meant sacrificing some of the things I really wanted, but I think it's more practical.

Our final meeting with Herr Weber was this afternoon, picking out individual pieces of equipment (I had to scale back on my oven and dishwasher choices, which were way over our budget, but we've chosen an excellent fridge and hob), and we've basically ordered this to be installed in Spring next year, getting a good deal just about within our budget, but with, we think, great quality stuff.
Of course, what is not modelled above are things like the posts and beams, not to mention the extractor hood, so here's an early preview from Schäfer + Fitz.

Thursday, 19 July 2012
Adding more layers
More pictures, less text.
The back of the house got its first coat of plaster last week, making it less Lego-like.


Meanwhile, inside, I experimented with Putzschiene and Eckschiene (I think they're called beading and corner beading in English) as a means to get an even surface on the gable wall of the living room. This wall bellies outwards a bit, so it needed to be evened up before receiving internal insulation boards.
First, fixed up the beading at each end of the room, then when it had hardened, strung a line between them as a guide for the rest. Corner beading along the inside of the window opes, and continue the vertical line with the regular beading. The resulting straight edge meant a plaster depth of about 7mm at the top and bottom of the wall, and 2-3cm in the middle.
To fill that larger gap, lumps of mortar were thrown at the wall and allowed to harden before plastering and finishing using a 2m-long aluminium featheredge. Job done.
 On the front of the house, Enver, of the Bakan Clan (more of them anon), fitted sheet metal to cover the step in the wall. Basically, we wanted this done as when it rained, water would fall onto a horizontal surface and could seep in under the main beam running along the front of the house. Now it's sealed. It's a bit shiny, but perfectly fitted (I gut the chase into the beam, which was not pleasant work), and when it weathers to a dull grey it'll match the facade just fine.
Back in the kitchen, the plans are coming along, and today we more or less completed the desired layout, so all that is left to do is to choose equipment, fronts and handles, and get a good price! To help get to grips with the spacing, I sprayed out the placement of the units. This actually helped a lot in figuring out how people would move about the kitchen, and identified some bottlenecks. The post in the middle is a nice feature, but takes a little planning around.

So, moving along, but still too slow on the inside for my liking, but that's down to my own energy levels, which are currently low. Still, the living room is coming along nicely. Just a little more plastering to do before the base wiring and plumbing can go in!

The back of the house got its first coat of plaster last week, making it less Lego-like.


Meanwhile, inside, I experimented with Putzschiene and Eckschiene (I think they're called beading and corner beading in English) as a means to get an even surface on the gable wall of the living room. This wall bellies outwards a bit, so it needed to be evened up before receiving internal insulation boards.
First, fixed up the beading at each end of the room, then when it had hardened, strung a line between them as a guide for the rest. Corner beading along the inside of the window opes, and continue the vertical line with the regular beading. The resulting straight edge meant a plaster depth of about 7mm at the top and bottom of the wall, and 2-3cm in the middle.
 |
| Beading set. |
To fill that larger gap, lumps of mortar were thrown at the wall and allowed to harden before plastering and finishing using a 2m-long aluminium featheredge. Job done.
 |
| A dash of mortar |
 |
| Fresh plaster done |
 On the front of the house, Enver, of the Bakan Clan (more of them anon), fitted sheet metal to cover the step in the wall. Basically, we wanted this done as when it rained, water would fall onto a horizontal surface and could seep in under the main beam running along the front of the house. Now it's sealed. It's a bit shiny, but perfectly fitted (I gut the chase into the beam, which was not pleasant work), and when it weathers to a dull grey it'll match the facade just fine.
Back in the kitchen, the plans are coming along, and today we more or less completed the desired layout, so all that is left to do is to choose equipment, fronts and handles, and get a good price! To help get to grips with the spacing, I sprayed out the placement of the units. This actually helped a lot in figuring out how people would move about the kitchen, and identified some bottlenecks. The post in the middle is a nice feature, but takes a little planning around.

So, moving along, but still too slow on the inside for my liking, but that's down to my own energy levels, which are currently low. Still, the living room is coming along nicely. Just a little more plastering to do before the base wiring and plumbing can go in!

Subscribe to:
Posts (Atom)