Tuesday, 7 November 2017

New orchard plans

A few weeks ago, a lady popped by the house to ask if we were interested in buying a piece of orchard, just a 10 metres from the plot we bought in 2014. Four rows of trees that I'd been admiring, as they were well kept, and many labelled with the variety. Two rows had been in her family for many years, and the other two they purchased a few years ago. It was with heavy heart they decided to sell, but felt it was too much work as they had other projects to look after, something I could understand!


We had to chew it over, but decided we'd go for it, if for nothing else, to ensure that the apple trees stayed as they are, and not be felled and the ground incorporated into the adjoining tillage. We've agreed a fair price and are currently waiting for the legal parts to make it official.

On our current plot, we have the following apple varieties:
  • Goldparmäne (Reine des reinettes / King of the Pippens)
  • Cox Orange
  • Belle de Boskoop (both the normal and red mutation)
  • Klarapfel (White Transparent)
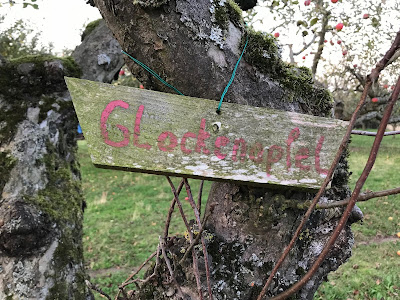
  • Glockenapfel
  • Jonathan
  • A couple others we do not know yet.

The new plot has all of the above, other than Jonathan, plus the following, that we know of:
  • Neckartaler (possibly also called Rheinischer Winterrambur)
  • Brettacher
  • Rubinette (one of the few "modern" varieties there)
  • Plus others unknown right now


The new plot has 54 trees (apple and pear), and our existing plot 30, with gaps across the two plots that leave generous space for another 20 new trees, which we will purchase for planting early in 2018. We've been researching German heritage apple varieties, of which there are a great many types, but also trying to make selections that would also be good for cider, in the Irish or British sense, rather than German.

So far, our list includes the following:
  • Börtlinger Weinapfel
  • Gravensteiner
  • Hauxapfel
  • Öhringer Blutstreifling
  • Rheinischer Bohnapfel
  • Schöner von Nordhausen
  • Zuccalmaglios Renette
We'll be adding some pear, cherry and plum trees to that list also, as the cherry plums behind our house are very old, and we'd like to ensure a supply in years to come.

I'd like to order some classic British cider apples from the UK. It's difficult to find suppliers that will ship to Germany, despite getting tips via Twitter from those in the know, and it seems that Orange Pippin Fruit Trees is one of the few that easily ship to mainland Europe, albeit with a limited selection of true cider apple varieties. So far, I think I'd like to order the following as half-standards:
  • Dabinett
  • Harry Master's Jersey
  • Ashmead's Kernel (as it sounds tasty)
Let's see where we end up.

Friday, 3 November 2017

Cider pressing 2017

Two weeks ago, the new mill and press got their first use. The harvest was a bit crap this year, after the late frosts, but we were lucky enough to gather about 330kg, enough to fill the wooden cask again, and maybe finally try keeving 60 litres.


The new mill is a real timesaver, compared to last year's manual efforts. Just keep it running, and feed it apples! The mechanism is really impressive, and it's easy to clean, as expected. The new press is also amazing! 250kg fit no problem, and from that, we got 150L of juice, so 60% extraction.
If you'd like to see the gear in action, have a look at the video below.


It's fermenting away now, and I'll leave it another while before transferring it to the oak cask. This weekend, I'll do a small pressing for the keev.


Friday, 13 October 2017

The electric apple mill

Last year, some readers may remember (could they ever forget?) that I had acquired a fruit mill and press from a friend’s parents, in a nearby village. They had been in a barn that was flooded badly in May 2016, when the region was badly hit with torrential rain. I cleaned up and restored what needed restoring, and put them to good use making cider.

But there was another mill in the barn, that was squatter-looking, had no hand crank, so needed a motor. I left it there. But earlier this year, they contacted me to say they had to empty the barn, as it was now sold, so anything that was still in it would be dumped. Needless to say, I went back and bought it for the princely sum of 20 Euro.


The remains of he floodwaters


It's red!

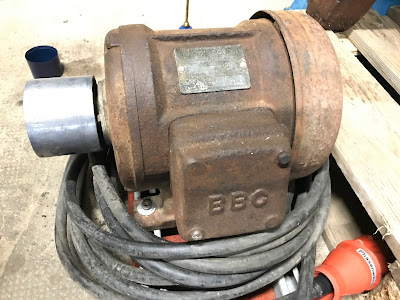
After an initial clean (my son got a chance to play with the pressure washer), to get the crusted mud off it, I left it over spring and summer, and only recently decided to pick up this little project, between building tasks. An added impetus to this, was the fact a neighbour, and fellow Stammtisch member, gave me an old electric motor, complete with cable and switches that he kindly mounted on a board for me (thanks Rüdiger!).

Although basically cleaned, the gears and axles were still pretty gummed up with a combination of crusted old oil, and silt from the flooding. It was time to take the whole thing apart and clean the individual pieces. 

No more mud, but very creaky.

Crusted old oil covered most of the moving parts.


The wooden stand got another clean with the pressure washer, and then some TLC with Murphy’s Oil Soap. The original colours seemed brighter, and with the layers of grime removed, any patches showing natural wood looked warmer.


I tried several methods to clean the gunk off the gears. I’d read hot citric acid was good, but it was not as effective as brake cleaner in getting the really bet-on crud off the parts.


No more old oil residue.
Lastly, any part that would be touching the fruit got a fresh coat of Kelterlack, the traditional resin-based paint for exactly that purpose. There were remains in the hopper and the milling parts and chute, so they got a light sanding and a new coat.


Reassembling was a piece of cake, and it was satisfying that everything could move with ease after the deep clean. Every moving part has a lubrication point, ranging from a simple hole or hollow on the smaller parts, through a mini cup with spring-loaded lid for one of the gear wheels, right through to oil baths, with a ring around the main axles, that would draw oil up and keep the axles lubed as they rotated. All very simple, all very effective.

The only thing missing was how to get it all moving. I had been asking around about motors the past year, and in the past couple of months, was given two. One from a chap who got a new circular saw, so didn’t need his anymore, and another ancient one from a neighbour, which I deemed more suitable, as it ran slower, and with a smaller drive wheel. Rüdiger, the neighbour, also happens to be an electrician (retired last month), so he mounted everything on a board, with switches and cables, and delivered it. In return, I brought 50 litres of cider to his retirement party, so I think we were both happy!


He also gave me some old leather drive belts, and a loan of a tool for fitting end a kind of catch at the end, such that a pin could be used to hold them together, and make a loop. No idea what they are called! But the photos should clarify. 


The belts were pretty dry and not so flexible, so they got a wash and an oil, so they were a bit more supple. They were ideal for the main drive belt, which needed 60mm, but another belt was needed to link the main drive axle to the axle the powers the pushing mechanism. This needed to be max 40mm, but due to the nature of the 60mm belts, and the fact they were shorter lengths stitched together, I couldn’t simply cut a centimetre off each side. I ended up buying a 2m length of 35mm belt, which cost 30 Euro, but it was worth it. I cut to length, fitted the clamps, and cut a section of a nail to use as a min to join the ends. It fitted perfectly.


First tests showed that it all worked very well, but to my mind, too fast. Normally, these would probably have been powered via a transmission, a bank of various-sized wheels on an axle, itself powered by a motor, so you could choose what wheel to attach the mill to, to get the right speed. We actually have one in the barn, fixed to the wall, but it is rusted fast. 


The alternative was to swap out the drive wheel on the mill for a larger one, and this is what we did. Good friend and brew-buddy Frank had one lying around, and his son milled a collar, to adapt it to the slightly smaller axle of the mill, so it fit like a glove. We gave it a test last night, and while it is definitely slower, I can't help thinking that the pushing mechanism is still a little too fast. We've a plan B, but we'll test the mill as it is first. Stand by for some video footage in the next week or two!


Friday, 6 October 2017

Insulating the last cellar

We moved into the house in February 2015, after about four years of heavy renovation work, but due to exhaustion, there was one cellar left uninsulated: the one under our living room. Our first winter in the house was relatively mild, so it wasn't so bad. But the winter of 2016/17 was bitterly cold, and we really noticed that the floor of the living room was much colder, and the cold crept in. Unfortunately, due to shoulder problems at the time, I could in no way do any overhead work, so we sealed up the cellar door to reduce the ingress of cold air, and lived with it.


This year, with the arm again movable, I decided enough was enough, and it needed to be done before the really cold weather comes again. After considering several options, from Rockwool to Styrofoam, I decided on a method that had relatively minimal effort, but also probably the most effective, using cellulose-based insulation, like our roof.

To do this effectively, the cellar ceiling had to be as airtight from underneath as possible, essentially creating a big bag, stuck to the walls, that would be later filled with isofloc. To start this, I plastered the top 15cm of the walls to ensure a smooth surface around the perimeter. An apron of breathable damp-proof membrane was glued around the perimeter, using a special sealant. This would form the sides of the "bag".

Once dried, a framework of 4x6cm timbers was then suspended from the oak beams, to a depth of about 12cm below the ceiling. This time, I used Justierschrauben (adjustment screws), which negated the need for planing blocks of wood to precise thicknesses to achieve the desired height, which is what I did in the other cellar, and under most of the floors, so I was glad to avoid that again!


The membrane was then attached to this frame, and the apron folded up and all seams taped closed, to form a single, sealed unit, and laths screwed to the initial framework, to provide support and something to attach the final ceiling finish to (not yet decided).


This alone already made a difference in the living room, as air couldn't move so easily up into the living room.

I'd taken a half day today, after agreeing with a local carpenter earlier this week that he'd come at one o'clock with a machine to blow the cellulose insulation into the void. He turned up at 1:30 to say he didn't have enough material, and asked if  we could do it in a week. This has pissed me off, as he said he had enough material, clearly didn't check, and could have gotten it even today from a nearby supplier. We reckon he's busy on another site, but I would prefer honesty. So much for German efficiency, again! I guess I got a long lunch break out of it.

Maybe next year we'll do something more with this room. The plan is to move my beer and cider cellar into here, as I need more room for barrels and fermenters, and maybe a table for when friends come around.

Anyway, let's see how it looks in a week's time.

Thursday, 28 September 2017

2017 Catch-up

Apple harvest time is upon us again, but before I get to posting about a new apple mill renovation project, I thought I should give a brief update of what has happened with the house this year. Building had taken a bit of a back seat the first 8 months of the year, but things are picking up again, with projects that had been put on the long finger getting attention again.

But first, back to December 2016! One of the worst things about the house in winter was the old front door. An aluminium and safety glass monstrosity from the 70s or 80s that would not seal right, and had ice crusts on the inside during the coldest winter nights. Towards the end of 2016 we'd finally ordered a door, so in December I took an angle grinder to the door ope, to cut a space for a future sandstone frame. The original was dumped when they rebuilt this section of the wall, presumably when the existing door was installed, so we felt it would be nice to reinstate a frame.


With the dirty work done, the new door was installed. It immediately made a difference to the climate inthe hall, being well insulated and closing properly, not to mention to the look and feel of the front of the house. Certainly more in keeping withthe style of the house. The colour matches the outer frames around the windows, so despite not being initially too sure about ordering that colour, we're very happy with it.


In January, we had some lovely snow, but also severe storms.

A view of the back of house.
It wasn't till a couple of days after the biggest storm, while walking over to our local, that I noticed the barn roof looked different. Walking around the other side, I saw a large chunk of roof missing. Inside the extent didn't look too bad, but those are asbestos corrugated sheets, and i wasn't happy having to deal with that at this stage. Sometime soon, I want to re-roof the stall part of the barn, and prepare it for solar panels, but that's another story.


Luckily, a good friend is in the trade, with the right kind of equipment, so the following day we bought material and patched up the hole with new cement-based sheets. Ugly, but necessary, and a little dear for a temporary fix.

Nearly done
The next big thing was the second vaulted cellar. I had done the walls and ceiling in May 2016 (May!), but had not been able to continue the floor due to shoulder problems in the autumn. In March this year, I was able to kick this off again, with the removal of 4 tonnes of heavy clay, to bring the floor level down a bit. As with the beer cellar, the idea here was to build up a layer of pebbles to promote drainage (this cellar is considerably damper tan the other), topped with crushed stone and a final brick layer.

The stages can be seen in the photos below, including painting with a silicate paint, but that's as far as it got, as i have not been able to source reasonably-priced old bricks. We may do something else if I don't find any soon. This cellar is intended to be used as a food store, and should be ideal for storage of spuds, carrots and the like, once I build a new door.


In between all of this were some more hobby-related tasks, mostly relating to alcohol production.
I acquired a Cabernet Sauvignon Barrique early in the year, directly from the Schneider winery, so I made a stand for it then brewed 200 litres of Imperial Brown Ale to age in it. It's now serving, and was worth the effort!


In late summer I then had my first foray into making fruit wine, after a neighbour asked if I would like to use his father's redcurrants. Sadly, his dad is no longer able to do it, so I was only too happy to help continue the tradition with them. We used a berry mill and the cutest press I've ever seen, both built by his father and uncle. We now have 54 litres in the cellar, finished fermenting, so I'll have to bottle soon.


I forgot to mention the apple brandy I got distilled in January, but I may come back to that in another post. But as the Schnapps buzz has me, I mashed up 60kg of our cherry plums, so am hoping this will make a nice schnapps in January!


And that's a quick roundup of the positive highlights of the past 10 months. Stand by for the attic conversion, cellar insulation and another apple mill restoration.