Last year, some readers may remember (could they ever
forget?) that I had acquired a fruit mill and press from a friend’s parents, in
a nearby village. They had been in a barn that was flooded badly in May 2016,
when the region was badly hit with torrential rain. I cleaned up and restored
what needed restoring, and put them to good use making cider.
But there was another mill in the barn, that was squatter-looking, had no hand crank, so needed a motor. I left it there. But earlier this year, they contacted me to say they had to empty the barn, as it was now sold, so anything that was still in it would be dumped. Needless to say, I went back and bought it for the princely sum of 20 Euro.
 |
| The remains of he floodwaters |
 |
| It's red! |
After an initial clean (my son got a chance to play with the pressure washer), to get the crusted mud off it, I
left it over spring and summer, and only recently decided to pick up this
little project, between building tasks. An added impetus to this, was the fact
a neighbour, and fellow Stammtisch
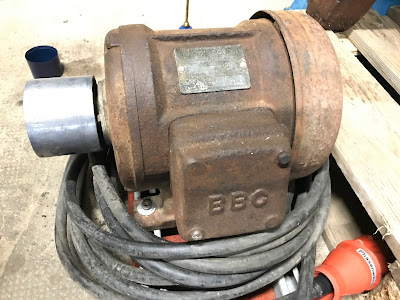
member, gave me an old electric motor, complete with cable and switches that he
kindly mounted on a board for me (thanks Rüdiger!).
Although basically cleaned, the gears and axles were still pretty
gummed up with a combination of crusted old oil, and silt from the flooding. It
was time to take the whole thing apart and clean the individual pieces.
 |
| No more mud, but very creaky. |
 |
| Crusted old oil covered most of the moving parts. |
The
wooden stand got another clean with the pressure washer, and then some TLC with
Murphy’s Oil Soap. The original colours seemed brighter, and with the layers of
grime removed, any patches showing natural wood looked warmer.
I tried several methods to clean the gunk off the gears. I’d
read hot citric acid was good, but it was not as effective as brake cleaner in
getting the really bet-on crud off the parts.
 |
| No more old oil residue. |
Lastly, any part that would be touching the fruit got a
fresh coat of Kelterlack, the traditional resin-based paint for exactly that
purpose. There were remains in the hopper and the milling parts and chute, so
they got a light sanding and a new coat.
Reassembling was a piece of cake, and it was satisfying that
everything could move with ease after the deep clean. Every moving part has a
lubrication point, ranging from a simple hole or hollow on the smaller parts,
through a mini cup with spring-loaded lid for one of the gear wheels, right
through to oil baths, with a ring around the main axles, that would draw oil up
and keep the axles lubed as they rotated. All very simple, all very effective.
The only thing missing was how to get it all moving. I had
been asking around about motors the past year, and in the past couple of
months, was given two. One from a chap who got a new circular saw, so didn’t
need his anymore, and another ancient one from a neighbour, which I deemed more
suitable, as it ran slower, and with a smaller drive wheel. Rüdiger, the
neighbour, also happens to be an electrician (retired last month), so he
mounted everything on a board, with switches and cables, and delivered it. In
return, I brought 50 litres of cider to his retirement party, so I think we
were both happy!
He also gave me some old leather drive belts, and a loan of
a tool for fitting end a kind of catch at the end, such that a pin could be
used to hold them together, and make a loop. No idea what they are called! But the
photos should clarify.
The belts were pretty dry and not so flexible, so they
got a wash and an oil, so they were a bit more supple. They were ideal for the
main drive belt, which needed 60mm, but another belt was needed to link the
main drive axle to the axle the powers the pushing mechanism. This needed to be
max 40mm, but due to the nature of the 60mm belts, and the fact they were
shorter lengths stitched together, I couldn’t simply cut a centimetre off each
side. I ended up buying a 2m length of 35mm belt, which cost 30 Euro, but it
was worth it. I cut to length, fitted the clamps, and cut a section of a nail
to use as a min to join the ends. It fitted perfectly.
First tests showed that it all worked very well, but to my
mind, too fast. Normally, these would probably have been powered via a
transmission, a bank of various-sized wheels on an axle, itself powered by a
motor, so you could choose what wheel to attach the mill to, to get the right
speed. We actually have one in the barn, fixed to the wall, but it is rusted
fast.
The alternative was to swap out the drive wheel on the mill for a larger
one, and this is what we did. Good friend and brew-buddy Frank had one lying
around, and his son milled a collar, to adapt it to the slightly smaller axle of
the mill, so it fit like a glove. We gave it a test last night, and while it is definitely slower, I can't help thinking that the pushing mechanism is still a little too fast. We've a plan B, but we'll test the mill as it is first. Stand by for some video footage in the next week or two!


No comments:
Post a Comment