Sunday, 4 September 2011

With a little help from my friends

Saturday was a busy day. My "brother-in-law", Chris, had offered to help, so stayed overnight so we could get an "early" start. His friend, René offered to help, despite not knowing me from Adam, and a neighbour I had also never met, Jörg, offered to help. Another neighbour loaned us their tractor and trailer to dispose of stuff that had been lying around in the house for months, and the remaining plasterboards we planned to remove.

Having whittled away on a room-by-room basis on my own for the past few months, it's amazing what can be done with four guys and a bunch of wrecking bars. Pretty much all the remaining false ceilings and dry-lined walls were removed and disposed of, and there's now a mountain of laths piles outside the house. Working from 10:30 till 6pm in pretty hot weather, with a break for beef stew and a beer, we steamed through it!

René, Chris, Jörg and your's truely.

A great way to get to know people, and engage in community spirit, it was great, and the beers (some home made by me) and the home-made Wurst from Jörg from 6pm till 11pm were even better! Enough words, here are some summary pictures.

1st floor bedroom, before.
1st floor bedroom, now.
The apparent new door in the centre of the photo above is actually where the chimney was. While having a door straight into the kitchen from here might be nice, we'd lose valuable wall space for kitchen units. But look at all that lovely wood now exposed!

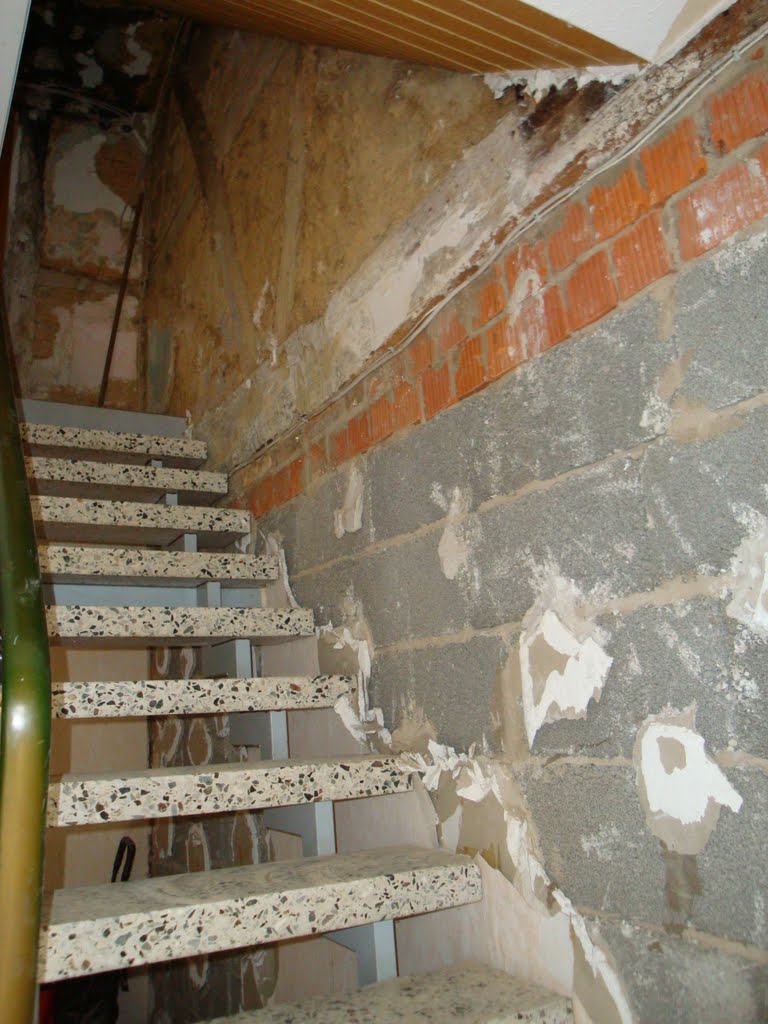
Main stairwell, July 2010.

And now.
Looking up, to the first floor.
There are always surprises to be found. I expected the ground floor wall in the stairwell to be stone, like the rest of walls at that level, but it was rebuilt some time with concrete blocks.

Looking down, to the 1st floor.
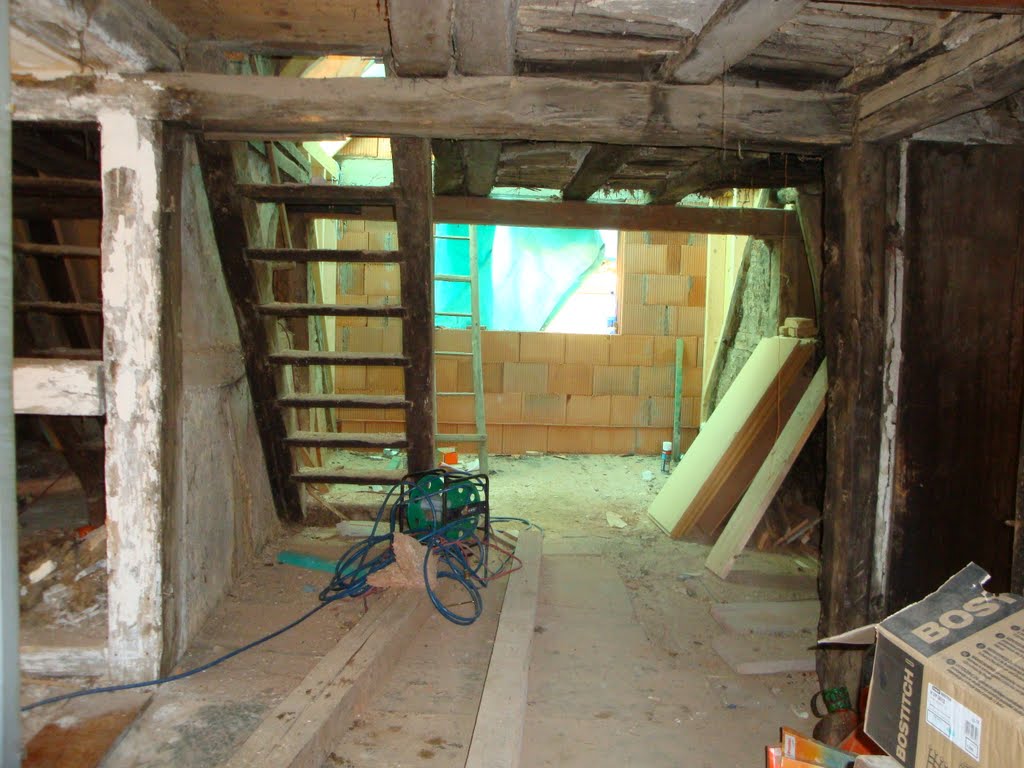
The landing on the second floor was also coated in plasterboard, and the guys did a neat job tidying it up and exposing the half-timbered construction (and a view through the dormer).
Landing on the 2nd floor.
2nd floor landing in the other direction, before.
2nd floor landing now.

The roof was also completed as far as possible on Friday. Lutz will return in a couple of weeks to put the roof tiles on.


The outside is looking a lot more promising than the inside!

Thursday, 1 September 2011

Roof almost complete

I have to say, Lutz, the carpenter/roofer and his team work like demons. They start at 7am and work till 5pm, at least, and in the past two days I've been away, the back of the house has been transformed. The roof is now watertight, apart from the gable dormer, and is ready for tiles which will come in about 2 weeks. A new roof frame has been built for the gable dormer, and it looks great. The roof windows need to be put in, but that'll just be a matter of cutting holes in the insulation boards. Speaking of which, these boards were a change from the original plan, and I'm pretty happy with the suggestion from Lutz. 35mm thick, wood-based insulation boards which are breathable, give an initial layer of insulation and sound-proofing, and they are environmentally friendly. They'll eventually be backed up with cellulose insulation to keep us snug.

Back of the house, September 1st, 2011
The view of the future bathroom inside the gable dormer.
Up at the apex.
There are a couple of open points that we didn't know were open points relating to the use of these insulation boards on the sides of the dormers on the front of the house, but a decision is needed soon, as this is delaying the gutter guy. I think I like the idea of using these boards there too (the gable dormer at the back has 55mm thick boards on the sides), but it means doubling up on some work that was already done. I'll have to make an executive decision.

Meanwhile, last Saturday I took the rest of the plasterboard ceiling down in the expanded kitchen. That was pretty dusty, with layers of clay dust from the original ceiling, and all sorts of grain lying  above the boards and, in one corner, an old rodent toilet with piles of shit and a little skeleton. The ceiling above is mostly original, with clay-covered laths between oak beams. In the foreground of the picture below, it can be seen that some of these were replaced in the 70s. Most impressive, is the 6-metre-long beam spanning the entire width of the kitchen, finally fully exposed. A new post has to go back in the middle, as otherwise the house would likely sink in on itself.

Kitchen ceiling, September 1, 2011.

The plan here is to leave the oak beams exposed and plaster between them. The newer ones can be completely covered, as they are modern tat. We'll see how far we get.

This weekend, it's going to be a big cleanup operation with three people coming to help. My "brother-in-law", his friend, and a neighbour I have never met, but who offered to help. Plan is to remove all the remaining dry lining and clear all the piles I've accumulated since early this year onto a trailer for proper disposal. Well, that and some food and beers for the helpers!

Friday, 26 August 2011

One wall up, another wall down.

It's been a slow week. Without the hive of activity that was the roof over the previous two weeks, the bricklayers pale in comparison. Still, for the 1.5 days they were on the site, another item is off the long list, and we can now properly visualise what the pack of the house will look like.

On Wednesday, they started building the gable wall for the bathroom, complete with a poured reinforced lintel for a 1.5m wide window.


 On Thursday, it took half a day to put the pointy bit on.

Keeping the roof covered properly was a minor challenge (as it was before), but luckily I stopped by, got a loan of another sheet from the roofer/neighbour, Lutz, and shoved it out at the ridge to form a tent over the gable. As the gable is now free-standing, we didn't want to lash anything directly to it, as it's been a little stormy at night, and I don't want that falling into the house.

In other news, we found that one of the walls between the new bathroom and a bedroom was very wobbly indeed, so it had to come out before it fell on someone.


This was a later construction of brick, as there was a smoker here (note the sooty stains all over this area), and wood wasn't allowed to be too close. You can see they truncated a cross-beam, and to be honest, I'd like some further support in there. It's a bit scary with all these open walls and spaces.


Knocking it down was a pushover, literally, and the shaft left by the demolished chimney saved carrying a load of bricks and plaster downstairs:

Rubble down the easy way into the kitchen

Things I really want/need to do soon:
  • Take down all the false ceilings on the first floor
  • Get a damn container to get rid of all the plasterboard lying about
  • Ditto for all the old wood

Saturday, 20 August 2011

More open areas and a mummy

Friday was a quiet day on the site. The general builders turned up for half a day to clean up some stuff and put some supports in the living room for when the broken beam gets taken out.

We did a little work. Should have started earlier in the day, but there you go.

On the second floor (or the first attic level), at the top of the stairs, we plan op opening it up a little to form a landing where maybe we'd have some room for an armchair and some bookshelves, as well as getting some light to spread from front (from the dormer) and the back (with a roof window). First thing to go has to be the wall in between.
Before.


After


Looks a bit grim now, but with the timbers cleaned up and oiled, I'm hoping for a lovely warm glow. The uprights seen in the photo above are a little loose, so could probably go. We'll see. I'm considering removing the material in between the timber construction on the wall to the right, but that's for another day.
Other small jobs that are a pain in the ass are things like separating Styrofoam backing from some of the plasterboard we removed. For waste disposal reasons, they cannot be mixed.

Removing this stuff is not fun.
And finally, this creature was found on top of the scaffolding. At least Lutz found it there on Thursday. I reckon one of the scaffolding guys found it high up on the east gable, perhaps behind the cladding that previously covered the gable.It looks like a cat to me, but it could be a pine marten, as we have them around too. Definitely well mummified, whatever it is. Poor thing. I was wondering if it got trapped after climbing through a hole from inside to behind the cladding.

Mummy 1.

We found another mummy in the barn today too! Definitely a cat, up in a store room we hadn't been into yet. Bloody cats...

Thursday, 18 August 2011

Building it up again

Once the wall came down, something had to put back. Although it'd be nice to have such a wide view out to the back, it'd present certain structural challenges, as a gable dormer has to be built over the gap.
The hole on Tuesday

The hole on Wednesday
On Wednesday, the guys built up a new wall, leaving a gap for a wide door frame. Above this is a reinforced concrete lintel which was poured on-site (you can see the boards holding it together above. They also enlarged the window which was above the sink, which was more or less like a letter box (a better view is below). Here's a quick before and after to see the full transformation:

Before.

After.
I guess the lintel needs a little time to cure before they continue building the facade of the new gable dormer, as they didn't turn up today. Still, there's lots more to be done!

Meanwhile, Lutz the roofer and his crew added some finishing details to the dormers on the front of the house, prepped the back and sealed it all up, as we're expecting a lot of rain tomorrow. He's away to another job for a week, which is just as well, as there's a dependency on the brick-layers to complete the gable wall before the new roof surfaces can be built.
Nice finishing touches on the dormers.
Ready for the rain.
The plans for the back have changed slightly in terms of roof window positioning and numbers (well, one less), so this is what we have to look forward to.

We've also changed some ideas for how this new room (the bathroom) will look, having decided to have this open all the way to the apex instead of a slightly raised ceiling. This might save some cash, as we'd leave some supporting beams floating across the room instead of the major job of moving them, but that's another story, and a few weeks away.

I'm still having nightmares about the whole building collapsing in a heap. :)

Tuesday, 16 August 2011

The day the (kitchen) wall came down

It really felt like a proper building site today. As well as the three guys continuing the roof, the general builders arrived to take down the back wall, lift the floor of the kitchen, knock down the wall between the rooms what will become the bigger kitchen and remove the rest of the chimney. All in a day's work!

Let's look back at the kitchen and former slaughter room/bake kitchen as they were when we first looked at the house in July 2010:

Former kitchen, July 2010.

Former... well, not a slaughter room any more, July 2010.
You can see how they then looked after a clear-out by January 2011 on a previous post, along with some of our ideas. Since then, we'd done some stripping down in these rooms, removing the dry walling. The wall between the two rooms was "modern", insofar as it was brick and not wattle and daub, timber construction like most of the internal walls.
The "slaughter room", April 2011, from almost the same angle
Floral pattern on plaster.
The oak beam spanning between the rooms was partially exposed by then, having previously been clad with wood panels. It is supported in the middle by a single post which we'll have to replace. Behind the back wall (at the left in the photo above) we exposed plasterwork painted with a floral pattern, probably applied with a roller or stencil. It still amazed me the amount of decoration and colours that were used before wallpaper became widespread. Or even after! This might not be that old.

The timbers and parts of the clay-based plaster on this wall are charred in places, perhaps attesting to the former bake kitchen role this room once had (as per plans from 1937, seen on an earlier post). Well, that and the chimney in the back-left corner, as seen in the photo below, with fire-powered pot still attached.

May 2011.
 The dark timber at the top-centre of the photo above is a former lintel, so it marks an original doorway into this room, which would have led from the small hall behind it in the days when the house was partitioned.

So how does it look now after one day of serious demolition?

August 16, 2011.

I can hardly believe it's the same room. The photo above was taken from outside, as the former bathroom wall was knocked down to make way for a new, thicker wall, suitable for an external wall. The chimney is gone, providing a view into the bedroom at the front of the house. Actually, I would have like to leave a bit of it in place to keep that corner closed, as I would have left the bricks exposed (but I was working, so couldn't poke my nose into their work).

The wall between the rooms came out pretty quick, really opening up the space. Till today, I couldn't visualise the size of our new kitchen, and I'm happy!

They also removed the tiled floor and the concrete layer underneath. The plan here was to lower the level a little, as it was 5cm higher than the floor of the former kitchen. Unfortunately, the top of the vaulted cellar (cellar 3) was higher than expected, so we'll have to figure out how to level things out without having a step up into the kitchen.

Top of the vaulted cellar.
The hole to the bottom-right was used for dropping spuds or the like down in the cellar after cleaning. I thought it might make a nice route for beer lines. The hole seen on the top left, beside he wheel barrow, was not planned, and is actually a breach over the vaulted entrance to the cellar. I doubt it's compromising the stability, but we'll have to patch it up.

So, a good day's work! Special thanks to Herr Keller, our architect, who popped in unexpectedly and set the course with a steady hand. The guys work really hard when they're here.

Oh, and the roof? Isn't that beautiful? The green counter battens look crooked as they follow the line of the original timbers underneath, which definitely are crooked (but I try not to let my imagination run too wild)
The roof with dormers, August 16, 2011.
I think work on the back roof surface starts tomorrow!


Sunday, 14 August 2011

The opening frame

Over the past few months, while waiting on the big work to begin, we've been tinkering about what smaller projects. I'm waiting till we shovel up all the rubble before posting the rest, but this is a nice piece of work done by my wife.

Cast your mind back to an early post about the first attic level, and this room. Here's what it looked like before we bought the house (taken while standing in the door).

July 2010.
Then, in January 2011 it had been cleaned out and the lovely wall paper stripped off.

January 2011.
The wall to the left of the shot above (against which the bed rested in 2010) is a south-facing wall behind which is the roof. One of our four dormers goes there, so naturally, to use it as a window, something had to happen to the wall. As it happens, the wall is half-timbered and structural, so it's not a case of just ripping it down.

June 2011.
Pretty, isn't it? And still traces of old paint-jobs. So, a dormer is planned behind it, but we're not exactly sure will it line up with the middle section, where a door originally lead into a storage space in the eves. Plus, we want even more light! Solution, take out the wattle and daub and see. An incredible amount of clay and straw between those few beams, and quite a bit of weight.

July 2011.
But first the roof has to come off and the dormer framework has to be built.

Monday, August 8th 2011.
And how does the dormer line up? Surprisingly well! We thought we might need to shift the upright timbers a little, but it may be that we just take out the lintel between them, and hey, access to the front! The top of the dormer is higher than we expected, but the architect is OK with this and said it'll get more light in.

Today. A view through to the dormer.
Note the pile of clay and straw is gone. Most of it now coats the inside of our car...