Sunday, 19 October 2014

If only we could decide on colours...

Busy, busy, busy. Feels like we're burning the candle at both ends, but not seeing all that much for it. But then, we're seeing every day, so when someone comes and visits the site and tells us it looks like we could move in already, then it feels good. Of course it's nowhere near ready, but a lot closer than a few months ago.

All the walls on the first floor have been filled, skimmed, sanded and primed, so are ready for painting. All the clay ceilings have also been primed, and the kitchen, office and bedroom have been painted with an "old white" silicate-based paint, for maximum breathability, one of the advantages of clay that we'd like to preserve.

I've been motoring on with making the window sills, and have 13 of 30 nearly complete. All they need is a sanding, some edging done (when my new router arrives next week) and a sealing/finishing before fitting. Once that's done, we can start painting the walls. The hardest part is now deciding on a colour scheme! For most of the rooms this should be easy, but for the kitchen, we want something that contrasts with the units, complements the floor tiles (which have touches of green, blue-green, earthy brown etc), all while not being either too dark or cold-looking. It's not easy when your head is still full of many construction decisions to be made.

Upstairs still needs attention, as we've been concentrating on getting the first floor complete, but I hope to get started with the skimming and final drywall construction on most of the second floor in the next couple of weeks. At least to get the hall areas clean, and one bedroom. A second bedroom would be a bonus, but I need to complete some lighting wiring there.

And last, but not least, our Elektromeister friend Sace has continued connecting my wiring to the trip switches and installing presence sensors and the like, so we've got light throughout the cellars, making it much more homely.

Have a look at a bit of a walk-through showing the highlights from the past three weeks.


And the photos:


Sunday, 28 September 2014

Let there be light

Milestone alert!


To see a video of this, have a look here. Yep! Pretty much a year after I laid the cables, and thanks to our Elektromeister friend, Sace Bakan, they are now hooked up doing their job. We now have a few working light and sockets, which makes a huge difference after three years having to bring an extension cable and light everywhere we went. It also feels like a working house, as we're getting near enough to the decorating stage.

Oiling of the beams on the second floor has continued, which certainly darkens, and livens the wood up.


In this shot, you can see the effect of the oil, as the base beam is partially oiled, and the diagonal on the right not yet oiled.


So we'll be getting some nice contrasts when the plastering and painting is done in this room.


Meanwhile, I've spend most of the past two weeks jointing, skimming and sanding, to get the final plaster surfaces ready for decorating. I skimmed the green boards in the kitchen yesterday, including the ceiling, and while it's far from perfect, a touch of sanding should do the trick.


Of course, the small details take time, like the transitions between old and new ceilings, which I did as simply as I could.

And of course, some more moulding and sanding needed, but it should look good once complete.


We also made a start on making the window sills, with the help of another friend, Werner, who has stuff like this brilliant table plane. I want one.


The sills are being made from glued laminated timber, so solid wood, but less risk of bowing or warping. My original idea of reusing some of the original solid oak floorboards as sills was a bit unrealisting, as they were not as straight as I thought.

We bought enough timber to make 24 sills, and the process is simple enough. We do some tricks to make it look thicker than the 18mm it has, by gluing a strip underneath. Once the basic shape has been cut and the fit checked, we'll round the edges with a router (slight rounding), then sand/polish them and oil them, with some final surface treatment to allow them to stand up to wear and tear.


And our tiles arrived just over a week ago, ahead of schedule. They'll stay in the barn for a few more weeks, till the kitchen ceiling and walls are decorated. Greener than we thought, but every tile is different, so it should be a nice effect.


And it's worth a video ;)


Monday, 15 September 2014

Mid-September mini-update

Work isn't going fast enough for me, despite the fact that every free hour the past week has been on the building site. But we did take a short break for a few days the week before, to visit Legoland and be tourists before school starts again, but small things have been lying heavily on my mind.

Skim coating and filling has continued in the living room, "bedroom" and office, while dry walling has resumed, this time in the hall, which had been neglected for some time now.


The stairs got some tender loving care from my wife and a Fein Multimaster, so the old grey paint is gone, as is the ugly cladding that used to be on the underside.


And the old brick chimney in the kitchen got a facelift with some joint a l'ancienne to repoint it with some very attractive mortar. Here's a before and after.


Actually, that was quite a lot of before and after in one shot. Plastering, plasterboard, floor, ceiling...

And for the gluttons for punishment, here's a another walk-through with the highlights from the past two weeks.


Friday, 12 September 2014

Kitchen is Coming

A phrase that strikes more fear into my heart than a winter in Westeros. Kitchen is coming. Week 46. Second week of November. This means a lot of things have to fall into place, at least in the kitchen, before then.

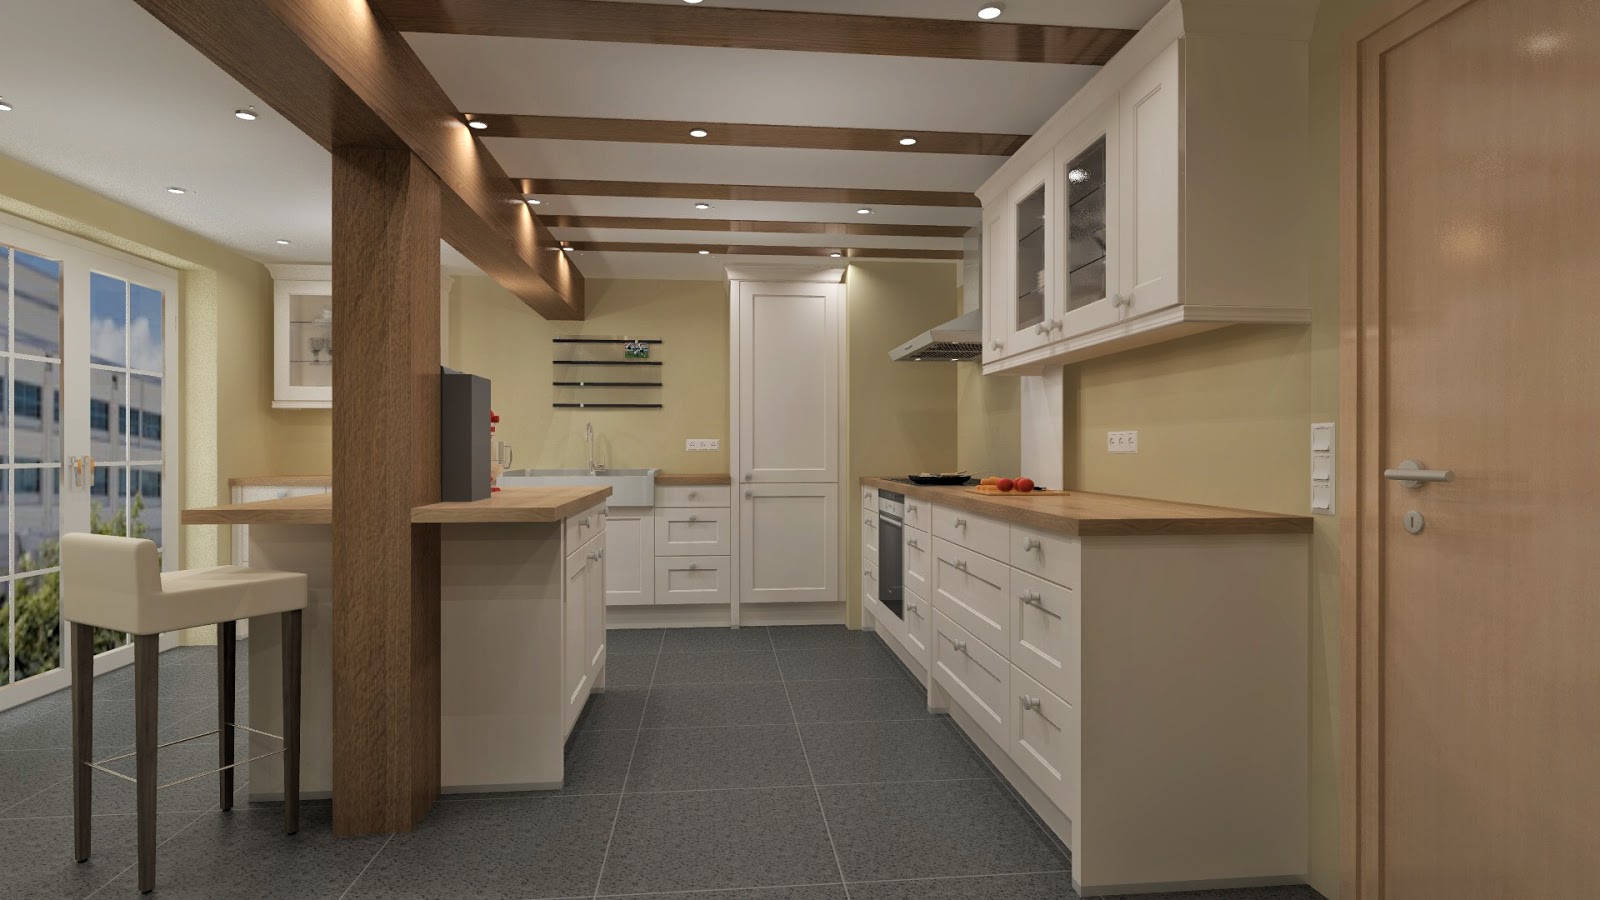
But let's take a look back. We actually got our original kitchen design done about two years ago. We naively thought we'd have it installed within six months, but that's pretty much a recurring theme with our renovation. SInce the plastering, plasterboards and underfloor were all done a few weeks ago, it was time to get WohnFitz (renamed from Schäfer & Fitz) back again to remeasure, and a few days later to revise the plans and make sure the equipment we ordered was still available.

As it turns out, the only thing that was no longer available was the double sink in farmhouse style, so we opted for a single basin, but with a draining board. We slightly shifted the island so there was more space between it ans the other kitchen units, and swapped around some presses with drawers.

I still regret not having an oven at chest level, but I'm happy with the overall layout. And given the wonderful 3D renderings from Frau Krieger, we can imagine how it might look quite well.


Yes, it could look like this!


So what has to be done? We ordered the floor tiles last weekend, so they should arrive from Italy in about a week. This is them.


Although there were paler versions of the same range available, we chose these to give a contrast with the vanilla tone of the kitchen units, so they work quite nicely together. We plan on laying them in about four weeks, so we've got that much time to sand down the filler/skim coats on the walls, paint the ceiling, connect the wiring and get the sockets running, apply whatever finish we decide on to the walls, and paint, if required. Not too much, actually, in the scheme of things.

My biggest issue is deciding on the wall finish. Either a roll-on plaster to give a slight structure to the finish (fine sandy grain), or just paint onto the skimmed walls. Then there's colours to choose. I could really do with tips from an interior designer to give some options, as my head is too full of construction details that need to be finished elsewhere.

Anyway. We're getting there, and the plan to move in before Christmas is still possible.

Friday, 29 August 2014

Big leaps!

It's been a full-on couple of weeks since the last update. I had been continuing to install the plasterboard walls on the second floor, but when our friend Sace turned up with the panels for the kitchen floor heating, the focus switched completely to that.

Over most of a day, we put down a thin layer of expanded clay aggregate to level out the hollows left by my poor attempt at a liquid screed, followed by the panels you see below. Once these were down, five heating loops were laid.


We had intended to pour a liquid screed (pumped this time, not mixed by hand), but when we checked the levels, we has less than the 40-45mm clearance recommended by the manufacturer. I have to admit, the liquid screed was more or less a plan B, as we thought it'd be cheaper and we'd have enough height, but originally, we'd discussed a synthetic resin screed, which is what we fell back to. Sace made a few calls, and the next day someone came over to have a look and give us a quote. Three days later, they came a did it. The results were... spectacular.


The beauty of this system  is that it needs no drying out time. So the next day, it was ready to be tiled. Also, you can go fairly thin, down to 1cm or so (we had 3 to 4cm).

If feels so weird having a perfectly level surface to walk on in the kitchen, after about three years of something resembling the surface of the moon.

This of course took away the last large barrier to our kitchen plans. Long-term-readers may recall we ordered our kitchen over 2 years ago, so it was time to revisit that, check the equipment still existed, and make some minor changes. I'll come to that in another post (it's worth it).

But of course, everything else needs to be done before the kitchen install, not least the floor tiles. But before that, the walls and ceilings need to be complete. Right now, the beams are all oiled, and the clay plater has been treated with a silicate-based "primer". The plasterboard walls and ceilings have been jointed and filled, and I've tried my hand at skim-coating the rest of the walls, with fairly decent results.


The skim-coating and filling has also continued into the living room, and once all of this gets some slight sanding and some corners cleaned up, we're actually ready to start decorating!Well, that and the window sills need to go in first.


So, quite a lot of progress in the last three weeks, but the next couple of weeks will be mostly filling, skimming and sanding, I fear.

And for those who like a proper commentary, here's a short walk-through of the first floor as of today. Click here for a large version.


Friday, 15 August 2014

Early August update

Things are moving fast at the moment, so I don't have time to write much, but here's a video taken on the 10th of August, with a walkthrough of the first and second floors. Changes since the last vid include a screed pour in the kitchen to level things out a bit, much progress with plasterboard work, completion of clay plastering on ceilings, and beginning oiling the oak ceiling beams, which look lovely.

Have a look at it big, then compare to the previous vid.


Already this week a lot more has happened, so we'll take a look at that next week.

Monday, 4 August 2014

The beer tap question

The beer cellar location
In the next few weeks, we're going to get into the final stages of the kitchen floor, so it's time to make a decision on something I'd been considering for the past three years: whether or not to install a beer tap in the kitchen. A decision has to be made soon, as it would mean drilling a hole down into the vaulted cellar (the future beer cellar) beneath the kitchen to run a beer line or two up.


The future beer cellar, under the kitchen.


The questions are:

Where in the kitchen would be practical to situate a two-tap font?


On the island is tempting, but too prominent. Beside the sink might be practical, but the hanging cabinet makes it awkward.

Is it really worth it for me alone, and the occasional guest?
My wife is not really a beer drinker, and while I'll have a few beers on the weekends, I try not to over-indulge during the week. Would it be gathering dust most of the time? Do I really want to have to drink most of an 18 litre keg alone?

Would it make me look like an alcoholic?
I think a nice font in the kitchen would be a feature, and a discussion point, and in keeping with my home brewing hobby. But perhaps not quite the right kind of discussion!

There are other solutions.
I will move to kegging my homebrew in the future, but I like having bottles for sharing, or drinking several different beers in one sitting. And for summer parties, I could always build a kegerator and house it in the old pigsty behind the house, which I will convert to a garden room/home brewery in the next couple of years. For personal use, I can always pop downstairs to the cellar to fetch a bottle, or pull a glass. Or sit down there beside the beer tap to hide my problem :)

So what do you think? If you were a beer geek, would you like to have a beer tap in the kitchen?