The Kispert guys finished this week, leaving us with a nicely compacted screed "patio", ready for paving sometime in the next five years, probably.
 |
| A new way up to the back of the field. Looking east. |
 |
| Looking south |
 |
| Looking west. Pigsty looking a lot taller now! |
Meanwhile, out front, Dieter Edinger painted the facade with a range of colours we selected, so we could get a better idea of what they look like in reality. We've three or four brown shades, ranging from red-brown to dark chocolate, and four off-white shades for the plasterwork.
 |
| Before the samples |
 |
| After the samples. |
It's harder than I thought to pick colours, as the feel of them changes with the light, but here's some closeups.
 |
| Red-brown, with a creamy-yellow filling. |
 |
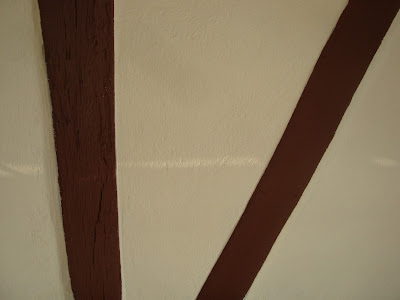
| Dark brown mixed with a cherry red, giving a chestnutty tone. |
 |
| Dark, chocolately Fachwerkbraun |
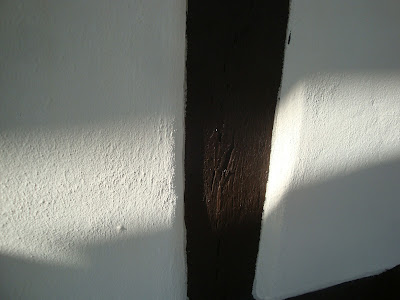 |
| Almost like charred wood, a private mix from Dieter Edinger. |
We're leaning towards the Fachwerkbraun (passers-by have also picked this as their favourite), but we have to be careful of the colour of the plasterwork, as too bright, and it's a bit sore on the eyes.
The windows will get new wooden frames to surround them, replacing the ones that were taken off some months ago. Friend and Architect, Uwe, suggested that we do a complete colour concept and provided some suggestions. I'd already been thinking of some aspects I'd liked from seeing other houses and far too much Internet browsing, and quite liked the idea of green surrounds, dark wood, and off-white infills. We selected some colours for the next test, which also has to be cleared with the building protection agency, and have several conceptual drawing provided by the architects. But even so, the very same day, Mr Edinger whipped up some boards with greens, and popped them up on the facade so we can see how they match. Theory being put into practice in the same day.
 |
| There's another green, but it's really GREEN. |
Actually, the main problem is we have too many choices. We have to pick colours for the wood, for the sandstone (who knew there were many sandstone colours!), for the plasterwork panels, for the plasterwork on the cellar level (we're going for a slightly darker shade than the top half of the building), for the window surrounds and doors and for the fascia boards. Very easy to get something far too busy-looking.
Having been away this week, it was about time I did some manual labour, so a quick job was done this evening truncating part of the barn roof overhang that was literally touching the house. It needed to be cut off to make room for insulation, and the Edinger team may be plaster the wall in question tomorrow morning, so best to get it out of the way. Basically, just cut a triangle off the corner of the roof and add a bracing lath.
Just need to prepare some wedged laths and it's good for cut tiles to go back on, and then get some new gutters sorted out.


